Friday, January 31, 2014

A Williamsburg Jacket

A quilted petticoat looks great with a jacket or caraco to go with it, so for my next project, I have decided to make a jacket. This combination would be something a middle class woman in the 18th century would have worn during the day.


I decided to make this jacket, which is in the Colonial Williamsburg collection, and for which there is a pattern on pgs. 39-42 of Costume Close-Up.


Lucky for me, Rebecca from Fashionable Frolick has made several versions of this jacket and very generously posted a tutorial on her blog, where she chronicles, with lots of photos, how she put this jacket together using 18th century methods.

The original jacket is made from linen, but I am making mine from some cotton I had in my fabric stash. I don't know if the fabric pattern is appropriate for the 18th century, but it looks like it could be to me.


I already enlarged the pattern from Costume Close-Up by scanning it into my computer, and then using the measurement grid on the pattern to enlarge it up to it's full size. I then cut this out of some scrap fabric in order to make a "toile", or mock-up to alter to fit me before cutting into my good fabric. 

This is where I usually choke when sewing something - the fitting part. Since I don't have any friends with the same love of historical clothing as I do, I have to fit things on myself, by myself. 

Using my mannequin, which I had tried to pad with batting to better mimic my own measurements, I fitted my mock-up over stays. Perhaps in response to my latest episode of fitting angst, a pin appeared on my Pinterest feed by Cathy Hay of Your Wardrobe Unlock'd featuring the Fabulous Fit system. 


This consists of a series of foam rubber pads and a stetchy cover, which is used to pad out an existing dressmaker's mannequin to more accurately represent an individual's measurements. Fabulous! I had tried doing this with batting with only so-so results, so this should be a vast improvement over what I was using. I immediately ordered it from Amazon. 

It arrived today, and I set to work padding out my mannequin. After struggling with shoving pads under the stretchy cover for 15 minutes, I finally got it to resemble my measurements...ugh...talk about depressing! But, that's a whole 'nother story! 

Next up, cutting the pieces from good fabric and cutting out the lining pieces.


Thursday, January 30, 2014

Matlasse, Marseilles and Corded Quilting

Since the Snow Queen and Jack Frost refuse to stop tag-teaming most of the U.S. with their particular idea of "fun", I've been staying inside and hibernating. How on earth did people deal with it in the past? Well, one way was by dressing warmly, even inside, and one of these ways for women was to wear quilted skirts or petticoats.

Most of the extant ones that I have found were made from silk satin.


I wanted to make one of these, but since my silk budget had to be sacrificed for a new gas furnace, and since I've really never done any quilting, I opted for a "cheat" to get the look. 

Matelasse (mat-la-say) is a cotton fabric that is often used for upholstery or bedspreads and is readily available at my local JoAnn fabrics. This fabric was originally made to imitate Broderie de Marseille, which is a form of three-dimensional textile sculpture using plain white cloth and white cotton cording that originated in Marseille, France in the 17th century. 

This is what Matlasse fabric looks like...kind of an embossed, quilted effect...


Real Broderie de Marseille looks like this -


I used the quilted petticoat diagram on page 36 of Costume Close-Up and cut six rectangular panels. The waistband is made of cotton Osnaburg with side ties of linen tape. It's probably not 100% historically accurate, but I did use natural fibers and it is all hand-sewn using cotton thread.


I will probably dye it, although the natural color resembles this petticoat...


Or this one...


Saturday, September 22, 2012

Lucy Locket Lost her Pocket...

...Kitty Fisher found it. There was not a penny in it, but a ribbon 'round it...

In th 18th century, women didn't lug around large purses like we do today to store the inevitable amount of junk they needed at their disposal on a daily basis; however, that doesn't mean that they didn't need something to carry around keys, money, handkerchiefs, love letters....Thus the "pocket" was born.

According to the VADS Pockets of History website...

"Just like Lucy Locket in the nursery rhyme, women and girls in the past had tie-on pockets instead of handbags to carry the things they needed. Although life in the past was markedly different from the present, the small possessions that people carried with them in their pockets was just as important to them and just as telling about how they lived their daily lives as they are for us today.

All through the 18th and 19th centuries, capacious and practical tie-on pockets remained a favourite for women. These pockets were not expensive or glamorous objects but they are rich in information and meaning. The ways they were made, decorated, used and even lost and stolen, reveal a lot about life in those times.

The pockets were tied around the waist usually underneath skirts or aprons. They had a special usefulness at this time because women of all social classes had little or no private space and few if any rights to own property. But they had significant roles and varied responsibilities within households, as employers or as servants, and many were involved in their families’ trades and businesses and it made sense to be prepared for all kinds of practicalities. Whether the contents of these pockets were utilitarian or precious, for daily use or private consumption, keeping them in a tie-on pocket was an efficient way of ensuring they were accessible and secure."

These tie-on pockets were sort of like an early form of the familiar "fanny pack" that we know of today, although worn underneath the clothes, not on top of.

They are a fairly simple design and an excellent way to practice or show off one's skill at embroidery.


There is a very nice template for an embroidered pocket on Page 68 of "Costume Close-Up", so I used that to embroider my own pocket.


It was a bit time consuming, but I worked on it in the evenings.


The finished pocket...


Saturday, September 1, 2012

Dresses I Must Make

Waiting rooms are not conducive to witty blog posts, as they usually involve one's nerves being on edge. So here are some fabulous frocks that are on my fantasy to do list...
ZOMG! Zone front!
I like the zone front on this and the fabric colors. I wish I could find more pictures of this gown from different angles.
This one because it's butter yellow and lavender...one of my favorite color combinations.


I like the belt and the stripes. It kind of resembles this gown from "The Duchess", except that this one is a zone front.


I like the pink and the flowers on this one.
I'm not sure why I like this one...something about the subtle color combination and the trim, although not particularly crazy about the straight across bottom on the stomacher - I think I would bring it to a point...


I like everything about this dress...the trim, the color combination, the style...


This dress mostly because it is my two favorite colors of blue and purple, but it has some interesting trim and texture as well...


I'm not generally interested in the Baroque period, but having watched a couple of movies set in the time of Charles II, and read about another seamstresses adventure in making a dress from this period, I can say I was a bit intrigued...If I was ever to make a dress from this era, I like the one in this painting of Catherine of Braganza, wife of Charles II, mostly I think because it's pink...


- Posted using BlogPress from my iPhone

Wednesday, August 29, 2012

Regency is not a New York State educational test

Yeah, okay, so the title of this post is lame, and you won't get it if you didn't go to school in New York State...so sue me...;-p

I've been suddenly struck by a mad frenzy of creativity after a long bout of malaise in matters concerning needle and thread. How can you blame me when I have had to endure not one, but TWO college level Algebra classes and you KNOW how I hate Algebra! (Well, maybe you didn't know...but you do now!) It's enough to drain out anything in the left brain...or what's left of my brain...

Quite some time ago I had made a really fabulous Regency stovepipe bonnet of an olive green silk with pink accents;


Of course, one needs a dress to go with it...There are several Regency era costume patterns out on the market, and since my draping skills are non-existant (one of these days I will remedy that), and I wanted something fairly accurate, I decided to go with the pattern from Sense and Sensibility. This pattern has had very good reviews and looks fairly easy to work with and alter.

RGP Cover

I bought the pattern a while ago, but then put it on the back burner. I decided to get it out again and finally make a gown to go with the bonnet. I had a vague idea of what I wanted to make, but did I want long sleeves, short sleeves, removeable sleeves so I could have both?...I scoured the Internet for examples of extant Regency gowns for inspiration but couldn't quite find what I wanted. I had this fabric that I wanted to use, because it went nicely with the colors in my bonnet.


In the meantime, I decided I had better start somewhere, and what better place to start than with underpinnings, because, afterall, you need the foundation before you can build the building. I also purchased the short stays and shift pattern from Sense and Sensibility. I made them entirely by handsewing, no machine at all! It's the first thing I have actually made to wear that I made completely by hand. It was actually a quite relaxing endeavor and gave me something to do whilst watching movies.


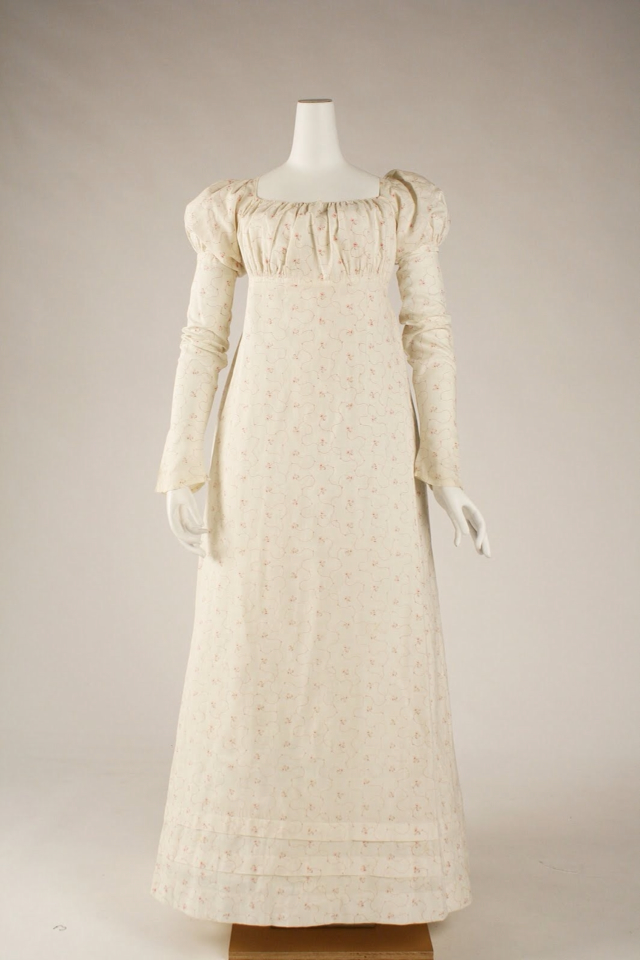
I still had no idea exactly what I wanted to do with the gown, until a few days ago while perusing Tumblr when I stumbled upon the perfect dress, which is on display at the Metropolitan Museum of Art in NYC! My fabric will work nicely with it and I like the simple, yet sweet look of it...


Sunday, June 17, 2012

Regency Shoes

I've been bad about keeping up with this blog, but I haven't really made anything worthy of posting. I've been collecting a series of historical reproduction shoes from American Duchess, and the fun part is you can embellish them yourself. I decided to decorate my Pemberlies, but first I wanted to practice. I had a pair of cheap white ballet flats from Walmart that I thought I would paint.


I got some acrylic leather paint from Tandy and mixed together white and yellow to make a pale yellow. I took the liberty of using the same yellow/blue combination that Lauren from American Duchess used on her Pemberlies as my practice colors. There was already a grosgrain ribbon border on the shoes which I colored blue with a marker.


I then pleated some grosgrain ribbon and hot glued it to the top of the shoes.


Then I made a couple of different embellishments from ribbon and sewed shoe clips on them.


- Posted using BlogPress from my iPhone

Saturday, August 13, 2011

Tails o' the Sea

Oh boy! What have I gotten myself into this time...This is proving to be messier and more difficult than I thought, but I'm already committed...(or is that I should BE committed!) I slathered on a thicker layer of Alex caulking, let it get gummy and then laid down fish net. I was going to try the metal grate "stamp" thing, but couldn't find a grate with the right pattern locally. So, I know I had seen someone using fish net to make the scales; however, what I didn't realize is that the net doesn't come off of the caulk as easily as I thought it might. Either that, or I have to let it get even more "cured" before I try pulling it off.
Since the caulk is still "moldable", I experimented with sculpting the scales where the tail goes into the fluke - using an ordinary spoon...It seemed to work out pretty good. I may have to add more caulk as I go along to fill in holes and spots, but I think that may work out pretty good. For the fluke, I used a combination of a chopstick and a sponge paint brush that I had cut so that I could give the fluke some texture.
It doesn't look too bad so far for my first attempt at this, but I'll need to work at it some more to "clean it up"  before I consider it ready to paint. Now to find an affordable air brushing kit and generator...

Well, that was a bad idea - soon after I went to check if I should pull the netting out, I realized that I had let it dry *too* long and that I couldn't get the net out without tearing up my fabulous caulking job. So, in a panic, I posted to the MerNetwork forums and asked for some advice. Merbel, who wrote the tutorial I am using, answered me and said to remove the net "immediately!", that it was better to waste the caulk than to ruin the neoprene and that I had indeed left the netting in the caulk for too long. She said I could always go back over it with more caulk to "fix" it. So, I carefully tore the netting away (it was a real bi*ch, I tell you!) and was left with quite a mess...it totally tweaked most of the tail and took away a good deal of caulk with it.
Interesting effect!
It did leave some kind of cool looking intermittent scales though...So, back to the drawing board. I tried to fill in some of the empty spots - I may just kind of leave it with the intermittent scales...gives it a kind of punk, tattered fish effect, maybe more realistic and not so perfect. I'm still working on it and trying to figure out different ways to "sculpt" the scales. The edge of a teaspoon works pretty good if you press it upside down into the caulk while it's still kind of gummy and sticky.
I really wish the metal grating had worked out. I ended up finding some at Lowe's, but I felt that the shapes were too small for the size of the tail. I thought about finding one of those copper cake/jello molds that look like a fish and using the scales on that as a stamp. I still may try that if I can find one....there's got to be a better way!