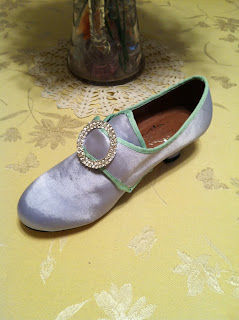
I got the round buckles, but I think I may get some square ones too, just for a different look...Or I'll try the "ribbon lappet" thing.
I had a hard time deciding what color to dye them! Pink? Blue? Green? I decided on blue, with green grosgrain trim around them, so I fearlessly jumped into the whole dyeing thing with reckless abandon! Was I afraid of ruining them? You bet! But I figured the worst I would have to do is make them some sort of darker color or maybe try dye remover. At any rate, I decided to try the tutorial on dyeing shoes by The Dreamstress I picked up some royal blue dye at Walmart - it was Tulip brand - less than a buck - and I wasn't sure how well it would work, but it was either that or Rit and I wasn't really sure there was that much of a difference except price.
I heated up some water on the stove, poured it into my stainless steel sink, added the dye and stirred it up. I then took a paint brush - all I had was a 1" wide paintbrush, not the wide one that is used in the tutorial, and I crossed my fingers that it would work. First, I tried it out on the swatch that was included with the shoes (what a freakin' awesome idea! Thanks, Lauren!), I let it dry and it didn't look half bad, so I dove into the shoes. Here is one shoe after one coat....Not too shabby! I was definitely impressed with both the dye and the ease and results of the technique of "painting" the dye on as opposed to "immersing" something in dye.
The lighting was a little dark in my kitchen, and the shoe was a bit damp, so it looks a little darker in this picture than it actually is after one coat. It looks a little closer to this picture:
I'm really excited about this! I think I'll give it one more coat after it dries good and call it a day! I've never dyed shoes before - I've been in weddings and had the shoes dyed, but this is so easy and SOOO much cheaper, that I would recommend this method to anyone who wants to dye a pair of silk shoes!
Here are a couple more photos of the finished product with different looks to the shoe. After I finished the dyeing process, I hand sewed green grosgrain ribbon around the edges. I also made a green and blue cockade and tried both the round buckles and square buckles.
The lighting was a little different on the last two pictures, so they look lighter blue than they actually are - The color is closer to the blue in the first picture with the round buckles.


0 comments:
Post a Comment